How to Run a PostgreSQL Server Using the Model Context Protocol (MCP)
Hello everyone, this is AM from the Efficiency Improvement Team at Hirose Paper Mfg Co., Ltd.
Today, I’d like to introduce how to run a PostgreSQL server using the increasingly talked-about Model Context Protocol (MCP) in the generative AI world.
MCP is an open-source standard developed by Anthropic—the company behind the generative AI model “Claude”—and it’s currently gaining a lot of attention. I’ve been experimenting with it myself and can really sense its potential.
Thankfully, the official Git repository provides a Dockerfile specifically for running a PostgreSQL server environment. So, this time, I’ll walk you through the setup using Docker.
Before jumping into the steps, there are a few things you’ll need to install. Specifically, the following three tools:
- 1. Claude for Desktop
- 2. Docker Desktop
- 3. PostgreSQL
I’ll explain each installation and configuration in detail, so you can follow along step by step. Let’s start by setting up the basic environment! Of course, if you’ve already installed these tools, feel free to skip ahead.
Now, let’s dive into the actual setup process.
Table of Contents
Preparation
To run PostgreSQL using the Model Context Protocol (MCP), you’ll need to install the following three software tools:
The first is “Claude for Desktop,” the desktop application for Anthropic’s powerful AI assistant Claude.
The second is “Docker Desktop,” the official containerization environment that we’ll use to run the MCP server.
The third is “PostgreSQL,” an open-source relational database management system, which we’ll use as the backend database.
Once these three tools are properly installed, you’ll be ready to use MCP to interact with PostgreSQL data via Claude. Let’s go through each step in detail.
Installing Claude for Desktop
Start by downloading the Claude for Desktop installer from the official website. Installers are available for both Windows and macOS—please choose the version that matches your system.
Once installed, enable Developer Mode, which is essential for the MCP integration. Open Claude for Desktop, click the three-line menu in the top-left corner, select “Help,” and then click “Enable Developer Mode.”
This setting unlocks features necessary for MCP integration.
Note that you’ll need an Anthropic account to use Claude for Desktop. If you don’t have one yet, you can create an account from the initial launch screen.
Forgetting to enable Developer Mode may cause MCP features to malfunction later, so make sure you’ve got this part covered.
Installing Docker Desktop
To install Docker Desktop, go to the official Docker site. Find and click the “Download Docker Desktop” button and download the appropriate installer for your operating system.
After downloading, launch the installer by double-clicking it.
Most of the installation settings can be left as default. If prompted to restart your PC after installation, follow the instructions and restart.
After rebooting, launch Docker Desktop. You’ll see a tutorial—feel free to skip it.
Once installed, a whale icon will appear in your taskbar (Windows) or menu bar (Mac). This indicates that Docker Desktop is running correctly.
You’re now ready to build your MCP server environment.
Installing and Setting Up PostgreSQL
To install PostgreSQL, visit the official site and download the installer that matches your OS.
During the installation, make sure to note down the password you set for the “postgres” user—you’ll need it later.
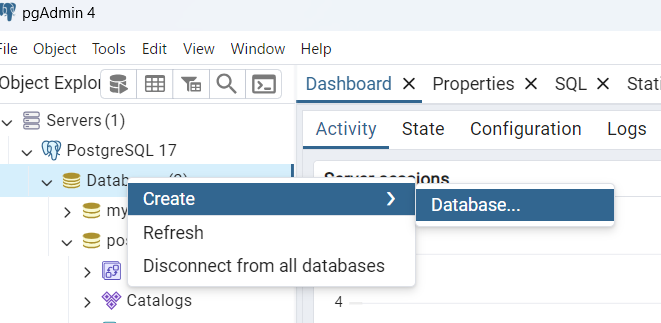
Once installed, use the bundled GUI tool “pgAdmin4” to create your database. You can launch pgAdmin4 by double-clicking its executable file.
Here’s how to create a new database:
- 1. In the left-hand browser panel, right-click on “Databases.”
- 2. Choose “Create” → “Database.”
- 3. Enter “mydb” as the database name (you can use a different name, but we’ll use this for the tutorial).
- 4. Leave “postgres” as the default owner.
- 5. Click the “Save” button.
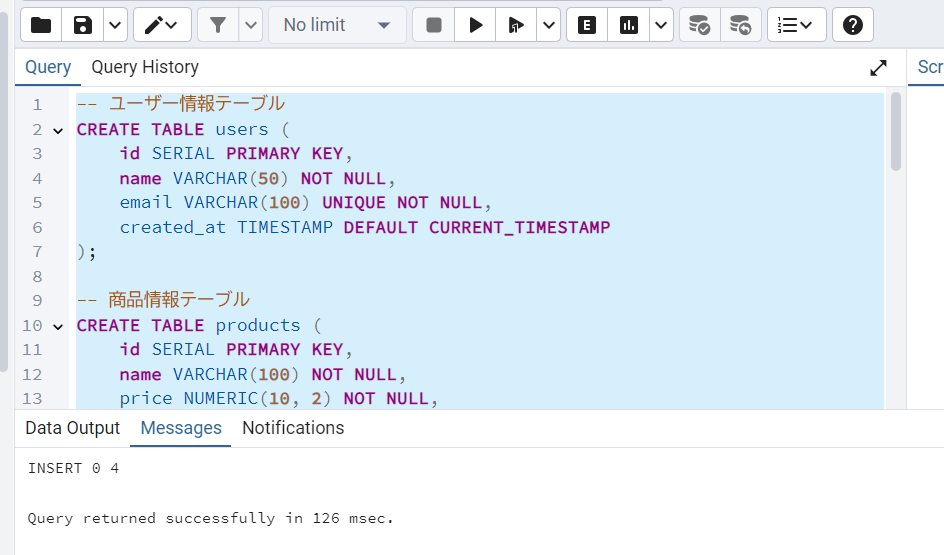
After creating the database, you can use the Query Tool to run SQL commands. Right-click on “mydb” and select “Query Tool” to open the query editor. You can input and execute SQL by clicking the play button (▶️) at the top of the screen. Use the following example SQL as a reference:
-- User table
CREATE TABLE users (
    id SERIAL PRIMARY KEY,
    name VARCHAR(50) NOT NULL,
    email VARCHAR(100) UNIQUE NOT NULL,
    created_at TIMESTAMP DEFAULT CURRENT_TIMESTAMP
);

-- Product table
CREATE TABLE products (
    id SERIAL PRIMARY KEY,
    name VARCHAR(100) NOT NULL,
    price NUMERIC(10, 2) NOT NULL,
    stock INT NOT NULL,
    created_at TIMESTAMP DEFAULT CURRENT_TIMESTAMP
);

-- Purchase records table
CREATE TABLE purchase_records (
    id SERIAL PRIMARY KEY,
    user_id INT REFERENCES users(id),
    product_id INT REFERENCES products(id),
    quantity INT NOT NULL,
    purchase_date TIMESTAMP DEFAULT CURRENT_TIMESTAMP
);

-- Sample data
-- Users
INSERT INTO users (name, email) VALUES
('Alice', 'alice@example.com'),
('Bob', 'bob@example.com'),
('Charlie', 'charlie@example.com');

-- Products
INSERT INTO products (name, price, stock) VALUES
('Laptop', 1200.50, 10),
('Headphones', 150.00, 50),
('Keyboard', 80.99, 30),
('Mouse', 40.25, 100);

-- Purchases
INSERT INTO purchase_records (user_id, product_id, quantity) VALUES
(1, 1, 1), -- Alice buys 1 Laptop
(2, 2, 2), -- Bob buys 2 Headphones
(3, 3, 3), -- Charlie buys 3 Keyboards
(1, 4, 5); -- Alice buys 5 Mice
As you can see, setting up a database using pgAdmin4 is relatively simple.
Cloning the Repository and Building the Docker Image
Now, let’s build the MCP server for PostgreSQL using Docker. Start by cloning the mcp-servers GitHub repository. If you only need the PostgreSQL directory, you can download just that part.
Next, edit the configuration file for Claude for Desktop. Look for a file named “claude_desktop_config.json” in the install directory. If it doesn’t exist, create a new one. Add the following JSON configuration:
{
  "mcpServers":{
    "postgres":{
      "command":"docker",
      "args":[
        "run",
        "--rm",
        "-p",
        "5432:5432",
        "mcp/postgres"
      ]
    }
  }
}
After saving the config file, build the Docker image. Open your terminal and run the following command:
docker build -t mcp/postgres -f src/postgres/Dockerfile .※ Replace “src/postgres/Dockerfile” with the correct path to the Dockerfile in your environment.
Once the build is complete, restart Claude for Desktop. Simply clicking the close button won’t shut it down entirely—it will remain running in the background. On Windows, right-click the system tray icon; on Mac, right-click the Dock icon to quit completely before restarting.
If everything is configured correctly, you’ll see a hammer (🔨) icon at the bottom of the Claude chat window. This indicates that the connection to the MCP server has been successfully established.
Let’s Display Some Data!
Now that everything is set up, let’s try displaying some data!
Open Claude’s chat window—you should see the hammer (🔨) icon at the bottom, which confirms that MCP is properly configured.
You can now ask natural language questions to query the database. For example, try asking: “What did Alice purchase?” The LLM will dynamically generate SQL queries and retrieve data from your PostgreSQL database.
The first time you access the database, you may see a security prompt asking for access approval. After reviewing the details, click “Approve.”
Other questions like “What’s the current product stock?” or “Show me last month’s sales data” will also work. The goal is to query the database naturally, without needing to think in SQL.
If the data doesn’t appear, check the following:
- Is the PostgreSQL server running properly?
- Is your connection info (hostname, password) correct?
- Are the tables populated with the expected data?
Conclusion
In this article, we walked through how to connect Claude with a PostgreSQL database using the Model Context Protocol (MCP).
In this example, the LLM dynamically generated SQL queries, but if you’re considering using this in a real-world application, you may want to think carefully about letting the model directly manipulate your database—even in a read-only state. From a security perspective, and to avoid unintended changes, it might be safer to use a “Function Calling” approach where you predefine the functions the model can call.
MCP is still an emerging technology, and it remains to be seen whether it will become an industry standard. But if security features and fine-grained control continue to improve, we may start to see more practical use cases for database integration using MCP.
We’ll be keeping a close eye on its development and exploring more hands-on applications moving forward.